What is the Process for Roof Installation?
A well-installed roof is crucial for protecting your home from the elements, enhancing its appearance, and increasing its value. Understanding the roof installation process can help homeowners make informed decisions and ensure a smooth experience. This blog will guide you through the essential steps involved in installing a new roof.
1. Initial Consultation
1.1. Scheduling an Inspection
The first step in the roof installation process is scheduling an inspection. A professional roofing contractor will assess the condition of your current roof, identifying any damage or areas needing repair. This initial evaluation helps determine the best course of action for your new roof.
1.2. Discussing Needs and Preferences
During the consultation, you’ll discuss your needs and preferences with the contractor. This includes your desired roofing materials, style, and budget. Understanding your options will help you make informed choices that suit your home.
2. Choosing Roofing Materials
2.1. Overview of Common Roofing Materials
Various roofing materials are available, each with unique benefits. Common options include asphalt shingles, metal roofing, tiles, and wood. Your choice will depend on factors like durability, aesthetic appeal, and budget.
2.2. Factors Influencing Material Choice
Several factors influence your material choice, including your local climate, the architectural style of your home, and your long-term goals. A professional can guide you in selecting the best material for your specific needs.
3. Obtaining Necessary Permits
3.1. Importance of Permits
Before beginning any roof installation, it’s essential to obtain the necessary permits. This ensures compliance with local building codes and regulations, which can vary by area.
3.2. How the Contractor Handles Permits
Most experienced roofing contractors can manage the permit process on your behalf, ensuring all legal requirements are met.
4. Preparing for Installation
4.1. Pre-installation Checklist
Preparation is key to a successful roof installation. Homeowners should prepare by clearing the area around their homes, notifying neighbours of the upcoming work, and moving vehicles away from the site.
4.2. Protecting Landscaping and Property
To prevent damage during installation, contractors will take steps to protect your landscaping and property. They may use tarps or other materials to shield plants and structures from debris and falling materials. For those looking for professional guidance, it’s advisable to consider reliable roof installation services to ensure the job is done correctly.
5. Roof Installation Process
5.1. Removal of Old Roofing (if applicable)
If you are replacing an existing roof, the installation process begins with removing the old roofing materials. This involves careful dismantling to avoid damaging the underlying structure.
5.2. Inspecting and Repairing the Underlying Structure
Once the old roof is removed, the contractor will inspect the underlying structure for damage. Any necessary repairs should be addressed before proceeding with the installation of the new roof.
5.3. Installing Underlayment
After the structure is prepared, an underlayment is installed. This material acts as a secondary barrier, providing extra protection against moisture and enhancing the roof’s overall durability.
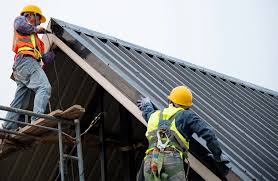
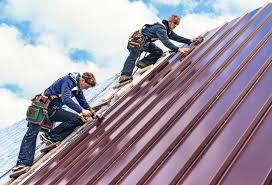
5.4. Installing New Roofing Material
The next step is installing the chosen roofing material. The installation process will vary depending on the material type, whether shingles, metal panels, or tiles.
5.5. Adding Flashing and Ventilation
Flashing is added to areas prone to leaks, such as around chimneys and vents. Adequate ventilation is also essential for maintaining the roof’s integrity and preventing moisture buildup.
6. Final Inspection and Clean-Up
6.1. Quality Assurance Check
Once the installation is complete, a quality assurance check is performed. This ensures that everything has been installed correctly and meets industry standards.
6.2. Site Clean-Up
After the inspection, the site will be cleaned up, removing debris and ensuring that the area is tidy. Homeowners should feel confident in the quality of work and the cleanliness of their property.
7. Post-Installation Care and Maintenance
7.1. Understanding Warranty Coverage
Most roofing installations come with warranties covering both materials and workmanship. It’s essential to understand the terms of these warranties and what is included.
7.2. Tips for Roof Maintenance
To keep your new roof in excellent condition, regular maintenance is crucial. Schedule routine inspections, clean gutters, and address minor repairs promptly to prolong the lifespan of your roof.
Conclusion
Understanding the roof installation process can help you feel more prepared and confident when undertaking such a significant project. From the initial consultation to post-installation care, each step is vital for ensuring your new roof’s success. If you have any questions or need assistance with your roof installation, consider consulting with a professional roofing contractor for expert guidance.